Managing Accounts. In previous Windows versions, we managed local user accounts in Control Panel, a desktop user interface that dates back to the earliest days of Windows
In previous Windows versions, we managed local user accounts in Control Panel, a desktop user interface that dates back to the earliest days of Windows. But in Windows 8, basic user account management tasks now occur within the Metro‑based PC Settings instead, while, confusingly, a few more advanced or esoteric features can still be found in legacy control panels. So you may find yourself moving back and forth between the two environments depending on your needs.
Let’s start with the basics.
Managing Accounts in PC Settings
Like many Metro interfaces, the Users section in PC Settings is almost disarmingly simple. As you can see in Figure 12‑4, this UI lets you manage features related to your own and other user accounts. (This figure displays the version of this screen that most users will see, since it depicts a Microsoft account.)
Figure 12‑4: PC Settings provides a new user management interface.
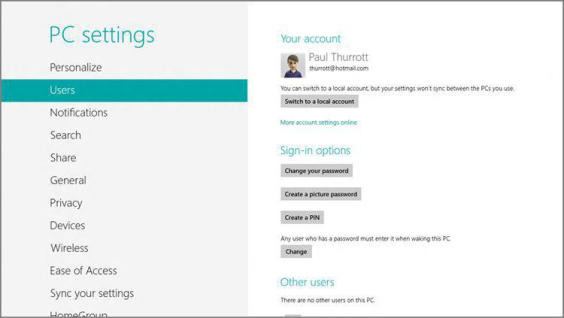
These features, which vary somewhat depending on the type of account you use to sign in, can include:
• Switch to a local account/Switch to a Microsoft account: If you’re signed in with a Microsoft account, there is a Switch to a local account button that will let you do just that, albeit at the expense of losing all of the included functionality one gets with such an account type. If you are signed in with a local account, however, you will see a Switch to a Microsoft account button instead.
• Connect your Microsoft account/Disconnect your Microsoft account: Those who are signed in with a domain account (used only in corporations and other businesses) will see a button, Connect your Microsoft account, as described earlier in this chapter. If you’ve already connected your domain account to a Microsoft account, you will see a Disconnect your Microsoft account button instead.
• Change your password: Those with local or Microsoft account sign‑ins can change their password at any time using this button. Domain users will not see this option; instead, you can type Ctrl + Alt + Del and choose the Change a password option from the full‑screen menu that appears. However, your ability to actually change your password will be based on corporate policy. (And, in fact, many businesses may require you to change passwords on a regular schedule, whether you want to or not.)
• Create a picture password/Change a picture password: With the advent of touch‑based Windows devices, including tablets and other touch screen devices, Windows 8 now offers two fun and efficient new ways to sign in to your computer: picture password and PIN (the latter of which is described next). Neither replaces your normal password. Instead, you can use either to implicitly sign in to the system using your actual password, but using a method that is simpler (and, in this case, a bit more fun) than a normal password. This is especially useful because tapping out a long password on a touch screen can be tedious.
A picture password is essentially a photo over which you trace any combination of three circles, lines, and/or taps, using the device’s touch screen. You might imagine a picture of a family member where you “poke” them in each eye and then draw a smile over their lips as an example of this type of sign‑in (though not necessarily one you would want to choose to use, since such a combination of swipes is fairly obvious and could undermine the security of your PC).
Creating a picture password requires completing a short wizard. After providing your password to prove that this is your account, you’re prompted to choose the photo you’ll use. Obviously, you can use any photo of your choosing.
Once you’ve selected the picture and the wizard has verified this selection, you’ll be prompted to set up your gestures, as shown in Figure 12‑5. Here, you choose the three gestures you want to use–again, any combination of three circles, lines, and/or taps–as your sign‑in.
Figure 12‑5: Creating a picture password
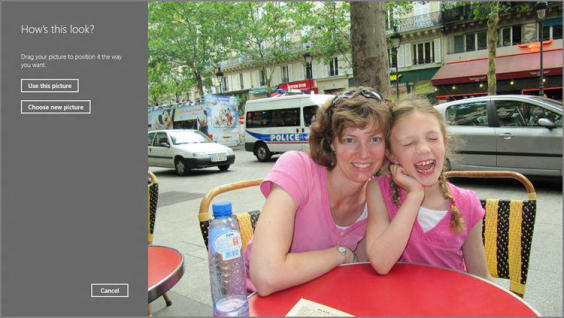
The wizard will make you repeat the gestures to ensure that you’ve got the sequence memorized correctly, and then you’re good to go. You can later change the picture password or remove it.
Дата добавления: 2015-05-13; просмотров: 1095;