Configuring Desktop Applications
From a compatibility perspective, Windows 8 works just like Windows 7, though you can now use the built‑in Application Compatibility tools to emulate Windows 7 if needed. But from our regular usage of Windows 8, it’s pretty obvious that little in the way of compatibility work will be required, and if you have an application that works with Windows 7, it should work fine with Windows 8 as well.
Of course, with the move to a Metro‑like user experience, Windows 8 users will need to deal with a few Metro‑related nuances when it comes to working with classic desktop applications. And the big two, in our experience, involve file associations and the pinning of applications to the Metro‑style Start screen.
Desktop Applications and File Associations
Most Windows users are probably familiar with the notion of file associations, where various applications are known to be compatible with different file types and Windows provides an interface by which you can select which of those applications is used by default. Likewise, Windows has long supported an Open With functionality that lets you override the default file association on the fly and use a different application. This latter capability is usually accessed by a right‑click context menu such as the one shown in Figure 4‑36. Here, we’re overriding the default file association for .jpg picture files and opening them with Windows Photo Viewer instead.
This functionality works as it did in Windows 7. But there is one major difference in this version of the OS: Windows 8 supports both new, Metro‑style apps as well as classic Windows applications. So it’s possible that the list of applications you could use to open a file will contain a mix of both Metro and desktop applications. And aside from Open With, which works as an Explorer extension as before, the interfaces you use to configure file associations are now Metro‑based.
Figure 4‑36: Overriding a file association with Open With

There are two key times you’ll run into these new interfaces. When you install a new application that tries to associate itself with various file types, Windows 8 will display a notification toast, like the one in Figure 4‑37, alerting you that there are new file association choices to make.
Figure 4‑37: The new file association notification toast
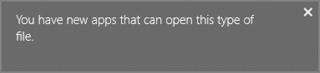
Figure 4‑38: The new Metro‑style file association interface
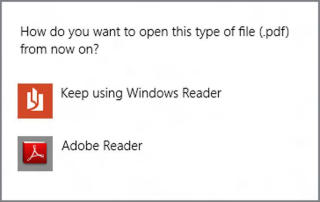
If you click the toast, you’ll be presented with a window similar to the one shown in Figure 4‑38. (It will, of course, vary according to the file type.) Here, you see a list of Metro‑style apps and desktop applications that can open a certain file type. And if you always want to open that file type with a certain application, this is a great time to make sure that happens.
And be sure to click the See All link to expand the window, when available, to see more options.
But what if you’re not quick enough and the toast disappears? Or perhaps you simply want to change the file association at a later time. In these situations, you can redisplay the new, Metro‑style file association interface in a surprisingly old‑fashioned way. Simply find a document or file type for which you want to change the associated application, right‑click it, and choose Open With and then Choose Default Program. Voila!
How Pin to Start Works for New Application Installs
We discussed how you can pin any application to the Metro‑style Start screen earlier in the chapter. What you might not realize, however, is that Windows 8 automatically pins application shortcuts to the Start search for you. This happens when you install any classic desktop application, and depending on the application, it can get ugly.
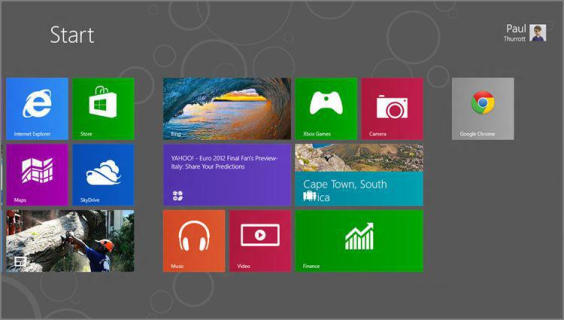
Some applications are simple, standalone affairs, and thus won’t pollute your Start screen with dozens of new icons. Install the desktop version of Google Chrome for example, and you’ll find that a single new tile is added to the end of the Start screen as shown in Figure 4‑39.
Figure 4‑39: When you install a desktop application, one or more tiles are added to the Start screen.
When you install more complex applications like Microsoft Office or Visual Studio, you could be in for a surprise: Some will populate the Start screen with multiple tiles, many for applications you’ll never (or perhaps rarely) need.
First, the bad news. You can’t stop this from happening. And the reason is simple: Because the Start screen replaces the Start menu, it emulates the Start menu, and this is the same behavior from Windows 7 and previous Windows versions, just a bit more in your face.
We discuss the many ways in which you can personalize the Start screen (and other aspects of Windows 8) in Chapter 5, but it’s wise to check this screen after each Windows application install to see which tiles were added. And then you can delete the ones you don’t want and, if desired, reorganize those you do.
Remember that deleting tiles from the Start screen won’t remove those applications. You can see this by opening the All Apps view by tapping Winkey (or Start) and then choosing All Apps from the Start screen app bar, which appears at the bottom of the screen. In this All Apps view, all of the installed applications are available and are even segregated in groups.
To display the toolbar‑like control called the app bar at the bottom of the screen, right‑click with the mouse, swipe up from the bottom of the screen with touch, or press Winkey + Z.
Дата добавления: 2015-05-13; просмотров: 1651;