Working with Files
While we await a future in which the data we work with is managed for us automatically via some cloud‑based mechanism, the reality of today is that we work with files regularly. These include documents related to work, such as Word documents, PowerPoint presentations, and Excel spreadsheets, as well as photo files, music files, video files, and many others. Windows 8, like all previous versions, includes all the basic file operations one might expect–copy, move, rename, delete, and so on–and many of these have been improved nicely in this release.
Copying and Moving Files
Microsoft has significantly updated the file copy and move experience in Windows 8, making it both faster and easier to manage. If you’re familiar with how this works in Windows 7 and older Windows versions, you know that each file and/or move operation you begin creates its own file or move window, and that each subsequent operation slows everything down to an eventual crawl. The multi‑window file copy/move experience in Windows 7 can be seen in Figure 4‑23.
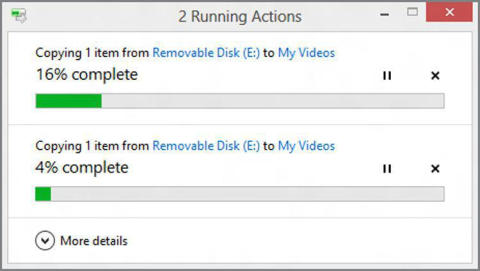
So how does one improve on a cluttered, slow experience? Simple: Make it streamlined and faster. And that’s exactly what’s happened in Windows 8. Now, file copies and moves all occur in a single window in which you can pause any copy or move processes if you’d like to give precedence to another operation. This can be seen in Figure 4‑24
Figure 4‑23: In older Windows versions, multiple file copies (and moves) resulted in slower performance and required multiple windows.
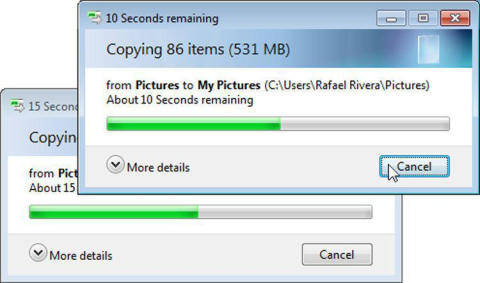
Figure 4‑24: The new file copy/move experience in Windows 8
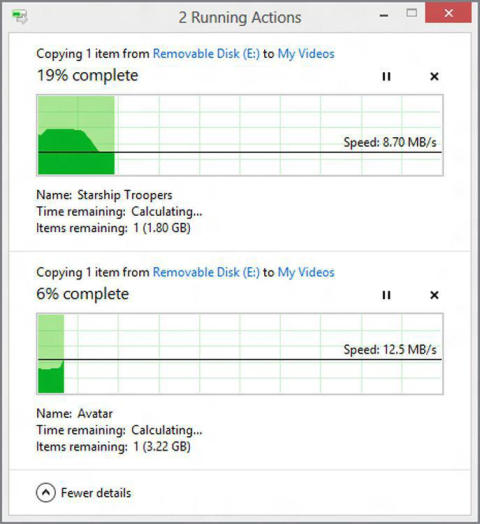
You can also click the More Details button to display a new detailed view of the file copy/move experience that shows the speed of the operation, how much data is left to transfer, and so on. This More Details view can be seen in Figure 4‑25.
Figure 4‑25: Detail view of the new file copy/move experience
Under the hood, things have improved dramatically, and file copies and moves occur much more quickly than before, even when you have multiple file operations going at once.
But what about when things go wrong? One of the most common things that can happen during a file copy or move operation is that one or more of the files involved in the operation already exists in the destination folder. So Windows has always offered up a dialog or window in these situations, asking the user what to do.
In Windows 7, Microsoft improved what it calls Explorer’s “confliction resolution” logic to pretty good effect. But in Windows 8, it’s done so again, offering its most obvious interface yet. This is actually quite important, because when you see the window shown in Figure 4‑26 in Windows 7, it’s not always clear which option you should choose.
You can find out more about each of the files in the conflict windows by mousing over them. A small tooltip will appear, displaying its path. Want to view the file? Just double‑click it. Yes, really.
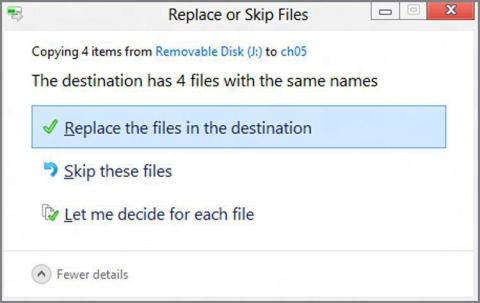
Things are considerably clearer in Windows 8. Now, when a file conflict occurs, you see the window shown in Figure 4‑27. The Replace or Skip Files window lets you choose which files have precedence globally or choose them on a file‑by‑file basis.
Figure 4‑26: Windows 7 made it somewhat difficult to resolve file copy and move conflicts.

Figure 4‑27: In Windows 8, file copy/move conflicts are more easily resolved.
Renaming Files
While the act of renaming a file is simple enough and hasn’t changed markedly since Windows 7, there is one neat aspect to multi‑file renaming that’s worth mentioning, since so few are aware of it. And that’s that Windows 8 supports a cool way of renaming multiple files in a folder.
To recap, you can rename an individual file by selecting it and pressing F2, by selecting it and then clicking it again with the mouse, or via touch by selecting it and then tapping it again. When a file is in rename mode, its name is highlighted as shown in Figure 4‑28. If you start typing now, you will replace the current name with whatever you type.
Figure 4‑28: When a file is in rename mode, its name appears highlighted.
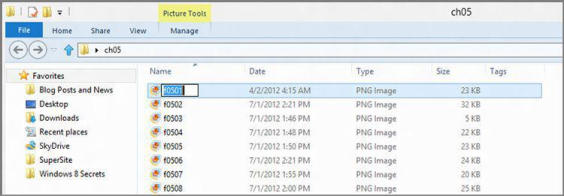
This renaming trick works with folders, too, not just files.
Normally, you hit Enter when you’re done renaming a file. But if you want to move to the next file and rename that, tap Tab instead. This will put the next file in rename mode, allowing you to instantly rename it next. You can keep tapping Tab, instead of Enter, to rename subsequent files in the current folder.
Pin to Start
In Windows 7, Microsoft allowed us to pin application shortcuts to the taskbar for the first time, providing a new way to launch applications. (Previously, you could only pin applications to the Start menu.) And starting with Internet Explorer 9, Microsoft provided this same capability to web apps, letting sites like Hotmail, SkyDrive, Amazon.com, The New York Times , and many others work like pseudo‑applications, pinned to the taskbar or Start menu for quick access.
This is very useful because most Windows users don’t spend all day using just Windows applications. They also use a lot of popular web apps and services. And by mixing and matching shortcuts for all of these things side by side on the taskbar, as shown in Figure 4‑29, users can organize their workspace in a way that mimics what they’re really doing all day long.
Figure 4‑29: You can mix desktop application and web app shortcuts on the taskbar in Windows 7 and 8.

These capabilities carry forward in Windows 8, and you can pin applications and web apps (via Internet Explorer 10, now) to the taskbar just as you did before, using exactly the same methods. But as you know, Microsoft is also replacing the Start menu with the new Start screen in Windows 8, and that interface is the primary place for you to manage and launch the apps you use most frequently. As discussed in Chapter 3, you can easily pin new Metro‑style apps to the Windows 8 Start screen. Can you do the same for classic, Windows desktop applications like Microsoft Word, Adobe Photoshop, and the like?
Yes, you can.
There are two basic interfaces for accomplishing this. You can use the new system‑wide search functionality that is available in Windows 8, as described later in this chapter. Or you can do so directly from File Explorer.
Here’s the best part. This functionality works for applications, as you’d expect. But it also works for libraries and folders. And you can pin favorite web apps and sites via Internet Explorer 10, though we cover that in Chapter 7.
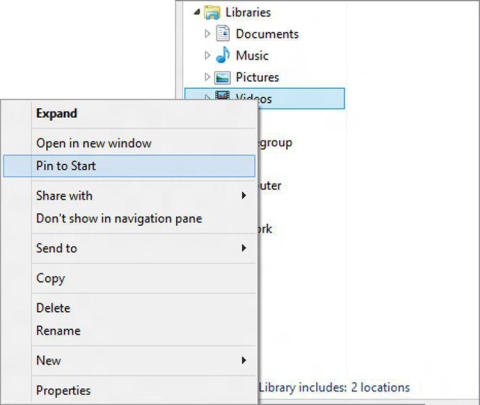
To pin a folder or library to the Start screen, navigate to the location’s container in File Explorer, right‑click it, and choose Pin to Start as shown in Figure 4‑30.
Figure 4‑30: You can pin applications to the Metro‑style Start screen from the desktop environment.
You can also Pin to Start from the new Explorer ribbon. Just select the folder or library and then choose Easy Access and then Pin to Start from the Home tab of the ribbon.
As with anything else that’s pinned to the Start screen, the folder or library is placed at the end of the Start screen. From there, you can position it as needed. (This functionality is discussed in Chapter 3 and Chapter 5.)
Дата добавления: 2015-05-13; просмотров: 1195;