Recovering Documents and Other Data Files with File History
When the time comes to recover a lost or previous version of a file, you have two basic ways to access the new File History restore functionality. You can relaunch the File History control panel and click the Restore personal files link. Or, you can use the far more discoverable method that’s available right in File Explorer. This latter option makes more sense for two reasons. Oftentimes when you’re looking for the previous version of a file, you’re staring at that folder anyway. And when you trigger File History restore from File Explorer, it will navigate automatically to that location for you. So you won’t need to hunt around for the file.
Since the Explorer ribbon is minimized by default, you may need to expand it before you will see the History command.
Since the second method makes so much more sense, we’ll examine that. Navigating in File Explorer to the scene of the crime–a folder in which a file was deleted or overwritten, perhaps–you will find a History command in the Home tab, as shown in Figure 11‑17.
Figure 11‑17: The History command opens File History restore for the current folder.

Click History to display the File History restore interface shown in Figure 11‑18.
Figure 11‑18: File History’s restore interface
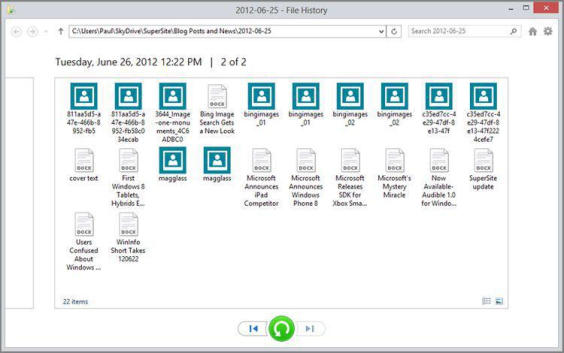
This window includes some interesting features. First, the current view shows the most recent file revisions, typically from the same day, and generally from a fairly recent time period. (If you left File History’s Save copies of files feature on the default setting, these versions will be less than one‑hour old.) There are navigational elements similar to those in File Explorer that allow you to go Back and Forward, and up one level, and you can type an arbitrary Explorer location into the address bar if you’d like.
The Options icon (which resembles a gear) in the top right provides numerous options related to icon view styles as well as some restore links. And the Windows Media Player‑like control at the bottom of the window will let you restore any selected files and folders, or all of them. Or you can click the Rewind button to see earlier versions of the backed‑up files. In fact, if you keep clicking this button, you’ll travel back in time (not literally), seeing multiple revisions of frequently‑accessed documents as you go.
If you find something you’d like to recover, you have two options: You can recover them directly to the same folder, overwriting whatever’s there now; or you can recover them to a different location.
To recover files and folders to the same location, just select what you want and then click the big blue Recover button. The wizard will ask you if you’d like to replace the current files, skip any duplications, or choose which files to keep in the current folder; this interface, shown in Figure 11‑19, is identical to the normal file remediation window one sees when copying files with Explorer.
Figure 11‑19: File History will ask you what to do with recovered files.

If you’d rather restore files to a new location so you can compare them side‑by‑side with the current version, click Options and then Restore to instead. A standard Save As dialog will appear, letting you pick the location you prefer.
NOTE
Yes, File History looks a lot like the Time Machine feature in Mac OS X, minus the ridiculous animations and graphics. To be fair, however, Microsoft implemented the underlying technologies behind File History several years before Apple copied them with Time Machine.
Better Together? Storage Spaces + File History
File History is an excellent way to ensure that your most valuable documents and other files are backed up regularly and available in different historical versions. Likewise, Storage Spaces is an amazing Windows 8 feature that provides redundant storage for your most valuable data, protecting them from a potential hard drive failure. Since File History works with secondary (or network‑based) disks by default, you may be thinking that there’s no benefit to using these two features together. That’s crazy talk.
For the ultimate in data protection, consider creating a storage space with two or more disks in a two‑way mirror configuration. Then, you can configure File History to back up your files to the space, instead of to a normal disk. In fact, you might want to advertise this location to other PCs in your homegroup so they can back up over the network to this new, super‑reliable disk mirror. This will enhance the resiliency of all of your backups, no matter which PC you use on the home network.
Like peanut butter and chocolate, File History and Storage Spaces are two great tastes that go together. And they form the basis for an amazing centralized home network backup solution you can use with multiple PCs. Just a thought.
Дата добавления: 2015-05-13; просмотров: 1286;