Enabling and Configuring File History
File History, like Storage Spaces, is implemented as a classic control panel. So the fastest way to access its configuration interface is to use Start Search. Or, display Control Panel via the new power user menu (mouse into the lower‑left corner of the screen, right‑click, and select Control Panel) and then search for File History using the preselected search box.
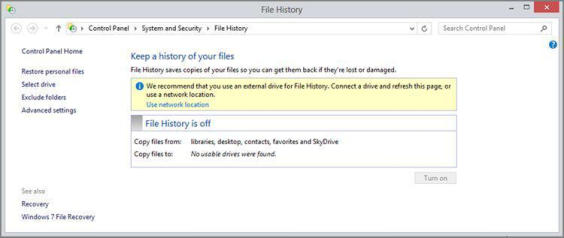
The File History control panel is shown in Figure 11‑14. As you can see, it’s disabled by default.
File History actually caches a subset of your file backups to your system disk. So this feature will often work just fine even when you’re away from home with a portable computer.
On a single disk PC or device, like your typical portable computer, File History will recommend using a network location.
Figure 11‑14: File History is disabled by default and will recommend a network location on a single disk system.
Alternatively, you can use any other disk, including a removable, USB‑based hard drive. If you have such a disk attached to the PC, File History will resemble Figure 11‑15, where the other disk is preselected.
Figure 11‑15: You can use secondary disks for File History as well.

To enable File History, simply click the Turn on button. However, some configuration options are available and should be considered first:
• Change drive : If you’re not happy with the drive that File History selected, click this link to select a new one. The resulting page will help you select a new disk, if one is available, or a network location.
Exclude folders : If you would like to exclude certain folder locations from being backed up, you can do so here. Remember that everything in your libraries, desktop, Favorites, and Contacts is backed up, so be sure to pick a folder inside one of those locations, since other locations are already omitted.
You can also manually run a File History backup at any time by revisiting the control panel and selecting Run now.
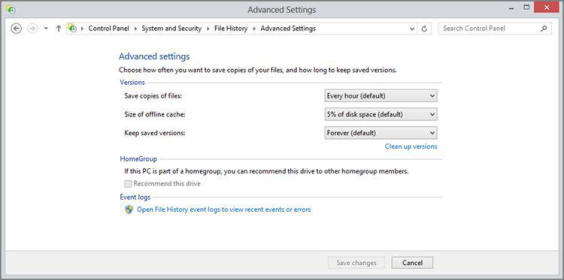
• Advanced settings : This important interface, shown in Figure 11‑16, provides some fine‑grained control over key File History functionality. You can change how often files are backed up, the size of the offline cache (which is the size of the File History backups replicated on your system disk), and the length of time to save backups. You can also use this interface to clean up (that is, delete) older backups and advertise your backup location to others on the homegroup.
Figure 11‑16: Be sure to spend some time examining these options.
Once you’ve configured File History to your liking, click Save changes to return to the main File History screen and then click Turn on. File History will indicate that it is saving copies of your files for the first time, but you are free to close the window, get back to work, and do other things. You can pretty much forget about File History until you need it.
Дата добавления: 2015-05-13; просмотров: 1458;