Managing Running Apps
Anyone who’s used Windows knows about the Alt + Tab keyboard shortcut that lets you quickly switch between running applications. It’s still there in Windows 8, and it’s still called Windows Flip, though we suspect few knew that .
Oddly, you can’t access the Start screen itself with Windows Flip.
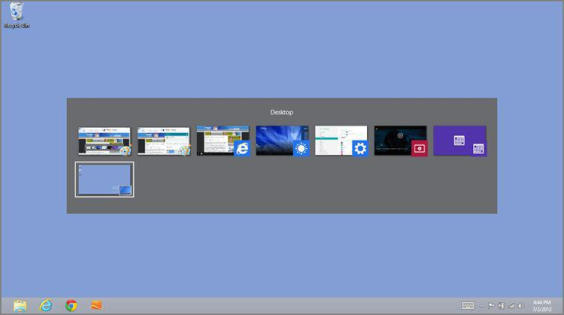
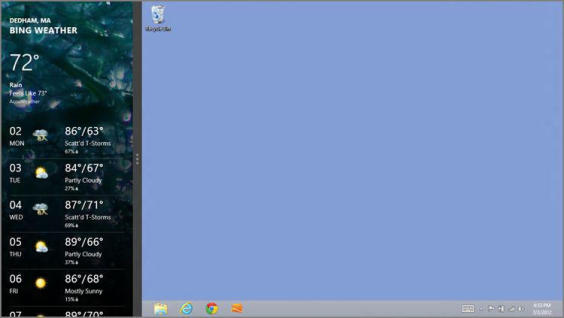
What’s different is that Windows Flip now includes Metro‑style apps as well as desktop applications and the Windows desktop, as you can see in Figure 3‑22. And Windows Flip is no longer the primary way to switch between running applications and apps.
Figure 3‑22: Windows Flip is still in Windows 8 and works with both apps and applications.
Instead, Windows 8 employs new Metro‑style UIs for switching between running apps, applications, the desktop and the Start screen. These include a new touch‑based interface for quickly swiping between views, plus the new features Back, Switcher, and the Start notification tip. And as you should expect, they’re each available from anywhere in the system, including the Start screen, any Metro‑style app, and the desktop. So let’s look at each in turn.
Switching Apps by Swiping
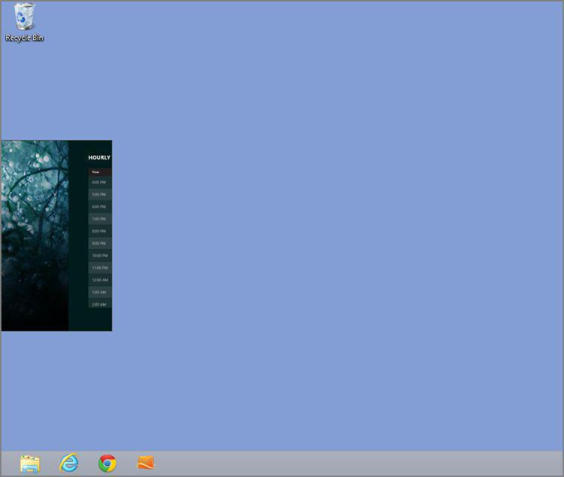
You can very easily switch between running apps, and the Windows desktop, using a new swipe gesture for multi‑touch‑based devices. To do so, swipe in from the leftmost edge of the screen. As you do, a large thumbnail of the next app in the “app stack”–the list of running apps–will appear, as in Figure 3‑23.
Figure 3‑23: Switching to the next app with a touch‑based swipe gesture.
There are a number of things you can do with this gesture:
• Switch to the next app: A single swipe will cause the next app to appear, replacing the app you were using as the only app on‑screen.
• Switch repeatedly through available apps: If you perform the aforementioned gesture repeatedly, you will quickly switch from app to app, navigating through each app in the app stack in turn. You will typically do this when the next app isn’t the app you’re looking for.
• Snap the next app: Windows 8 supports a unique side‑by‑side screen‑sharing mode called Snap. It can be engaged using this swipe gesture, but is important enough that we describe it separately later in the chapter.
• Enable Switcher: Windows 8 also includes a new app‑switching interface called Switcher. This, too, can be enabled via this swipe gesture, and we describe it in just a bit.
Back
For those readers lucky enough to own a multi‑touch‑based device, you can use the swipe‑based app switching gesture described a bit later instead. There’s no way to display the Back tip via touch.
The new Back experience is a toggle and it works much like quickly tapping Alt + Tab once: When you use it, you will return to the previous Metro‑style app or to the Windows desktop. To access the Back experience, move the mouse cursor into the top‑left corner of the screen. As you hit the corner, you’ll see a Back tip appear, as in Figure 3‑24, representing the previous app (or desktop) you used. To access that app, just click the tip.
Figure 3‑24: The new Back experience lets you switch to the previously used app easily.

Switcher
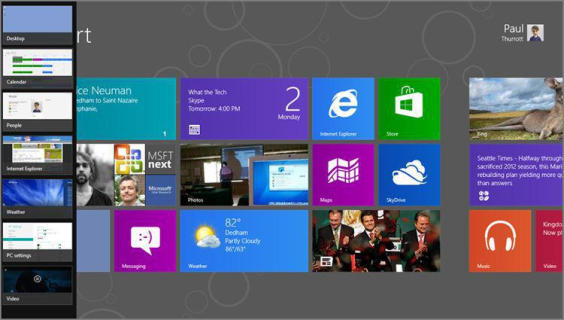
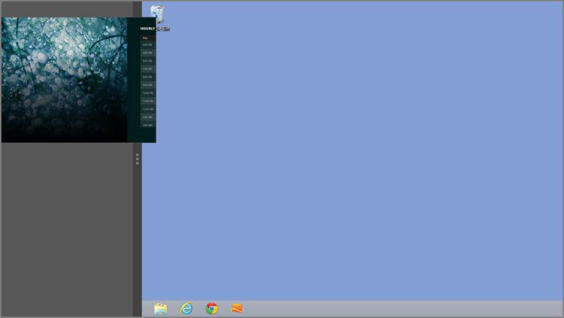
Back works well if you’re using a small number of apps. But if you’re a heavy multitasker, you’re going to want and expect a way to more easily access a particular app. So Windows 8 has a new interface called Switcher that provides Windows Flip‑like functionality in a Metro‑style interface. Shown in Figure 3‑25, Switcher can be enabled by typing Winkey + Tab.
Figure 3‑25: Switcher provides a Metro‑style list of your running apps.
The Windows Flip 3D application‑switching feature from Windows Vista and 7 has been replaced by Switcher in Windows 8. Sorry, Flip 3D fans.
Mouse and touch users can also utilize Switcher, though with a bit more difficulty.
With a mouse, the simplest way is to first trigger the Back tip by moving the mouse into the top‑left corner of the screen. When you do, you may notice that there are in fact a number of ghost‑like tile previews that run down the left edge of the screen, indicating that there are more running apps. To display Switcher, then, move the mouse down the left edge of the screen. As you do, the full Switcher interface will appear.
(If you’re familiar with Charms, you may understand that this behavior mimics how that interface is activated with a mouse. Likewise, you can alternatively mouse into the lower‑left corner of the screen and then move the mouse cursor up the left edge of the screen if that’s more natural.)
While most touch interactions are by definition simple, enabling Switcher with touch is actually pretty difficult. It goes like this: You swipe in from the left edge of the screen, but a bit more slowly than normal. When the large thumbnail for the next app appears, you stop swiping to the right and move your finger instead backward a bit, to the left. If you do it just right, Switcher will appear.
Start Notification Tip
While many will mourn the loss of the Start button from Windows 8, Microsoft removed it for a good reason: As a desktop‑based interface, it was only available in that environment and not in any Metro‑style apps. So the company came up with a decent replacement, called the Start notification tip, that works from anywhere in the system–the Start screen, the desktop, or any Metro‑style app–and works exactly like the Windows key (or Windows key button on devices); that is, it’s a toggle.
To see the Start notification tip, move the mouse into the lower‑left corner of the screen. As you do, a thumbnail will appear, representing either the Start screen or the previous screen (a Metro‑style app or the desktop). This is shown in Figure 3‑26.
Figure 3‑26: The Start notification tip
To navigate to the Start screen (or to the previous experience), just click it.
The Start notification tip isn’t available with a keyboard or touch because it’s not necessary. Keyboard users can use the Winkey as a toggle, as noted earlier, and touch users can use the Windows key button on their device or access the Start thumbnail that’s in Switcher.
Snap
After the wonder of Metro’s full‑screen experiences wears off, you may start to feel a bit constrained by this environment. After all, Windows is named Windows for a reason: It has historically provided access to multiple on‑screen windows–each representing applications and various system interfaces–simultaneously. And as our experience with Windows grew, many have come to expect this type of behavior. And yes, it’s still available with the desktops. But all of the Metro‑style apps are full‑screen only.
Well, not quite.
No, you’re not going to be running multiple Metro‑style apps on‑screen, as you can do with desktop‑based applications. There are security, performance, and battery life reasons for that, but no matter. What Microsoft is providing is a simple screen‑sharing feature called Snap, which lets you use two Metro‑style apps–or one Metro‑style app and the desktop–side by side, albeit in limited ways. In this configuration, one app–the so‑called snapped app–will occupy a small channel on the left or right side of the screen. And the other app, the so‑called main app, will occupy the rest.
Not all apps support snapping fully, because they’re either useless or next to useless in a snapped configuration. But some apps provide specifically tailored snap interfaces–like Calendar and Mail–and can be quite useful in this way.
Since a picture really is worth about a thousand words in this case, examine Figure 3‑27 to see what Snap looks like. Note that the app in the main area, on the right in this figure, can be the desktop or any Metro‑style app.
Figure 3‑27: Snap: Simple screen sharing
While there are a number of ways to snap an app, the most reliable–and consistent across mouse and touch–is to use Switcher. Here’s how you do so using either the mouse or touch.
After ensuring that the app (or desktop) you wish to have in the main view is on‑screen, enable Switcher. Then, grab the app you wish to snap from the Switcher list of app thumbnails, and then pull it out of Switcher. As you do, the Snap border bar, shown in Figure 3‑28, will appear. When it does, release the mouse button (or lift your finger from the screen) to snap the app.
Note that you can perform these same basic steps to snap the app on the right side of the screen. But instead of releasing the thumbnail when you pull it out of Switcher, drag it all the way over to the right edge of the screen until the Snap border bar appears there. Then release the mouse button (or lift your finger).
Figure 3‑28: Snapping an app
There are a few other things you can do with Snap. For example, you can reverse the snapped and main apps so that the previously snapped app now takes up most of the on‑screen real estate. To do so, just double‑click the Snap border bar. Or, with a touch screen, just drag the bar toward the middle of the screen and then lift your finger.
If you’re a keyboard shortcut junkie, Snap supports some cool shortcuts. For example, from any Metro‑style app, you can tap Winkey + . (period) to engage the Snap border bar and then tap that repeatedly to keep moving it to the right. (Winkey + Shift + . moves to the left.) We provide a complete list of Winkey keyboard shortcuts in the appendix.
TIP
If this is still too limiting, consider a multi‑monitor configuration. In this case, you can have the Start screen and all Metro‑style apps on one screen and the desktop and its applications spread across one or more other screens. We discuss this configuration in Chapter 5.
Дата добавления: 2015-05-13; просмотров: 1249;