Working with Devices
While new apps and other software‑based capabilities can extend the functionality of Windows 8 and make it better than it was before, adding new hardware devices is another approach. Add a printer, for example, and many of your apps will suddenly be able to print. Plug in an external USB‑based hard drive, and your PC has more storage, which can also be used by the OS and by many apps.
OK, we know you understand why adding a few hardware peripherals can make for a better computing experience. But we mention this here because the way in which Windows 8 interacts with these devices has changed, thanks to the switch to Metro. So while some legacy interfaces for dealing with hardware devices remain for backward compatibility reasons, much of your interactions with the devices in Windows 8 will now occur through Metro‑style experiences. And more often than not, that means the Devices charm.
Let’s look at some common examples.
Printing
The ability to print is obviously a core capability. And while installing printer drivers works as it did in earlier versions of Windows–through the desktop interface using familiar methods–as does printing from desktop‑based Windows applications, Metro‑style apps interact with printers through the Devices charm.
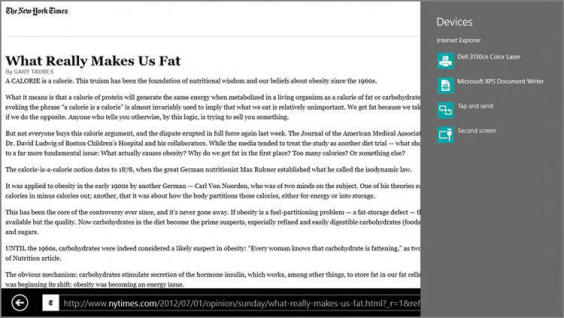
Consider the Metro‑style version of Internet Explorer 10. You’ve found a web page you want to print for posterity, but there’s no printer button in the app bar and no menu system at all. How do you print?
In Metro, printing–like other device access–is now consistent, and it happens through the Devices charm. So you display this charm (perhaps through the Charms bar, but Winkey + K is quicker), and you’ll see something resembling Figure 3‑34. And in that list of devices will be one or more printers, depending on how your PC is configured.
Figure 3‑34: The Devices pane
Too ponderous? Depending on the app, Ctrl + P still works for printing, too.
When you select the printer, the Devices pane will expand to reveal options related to that specific printer, as in Figure 3‑35. This interface will let you make last‑minute configurations before actually printing, with many of the options available via a More settings link.
To print, just tap Print.
Using Portable Storage
You may recall from previous Windows versions that an Auto Play window would appear when you plugged in an external storage device like a USB‑based hard drive. In Windows 8, Auto Play is now a Metro‑based experience. So when you plug in an external drive, you’ll see the interface in Figure 3‑36.
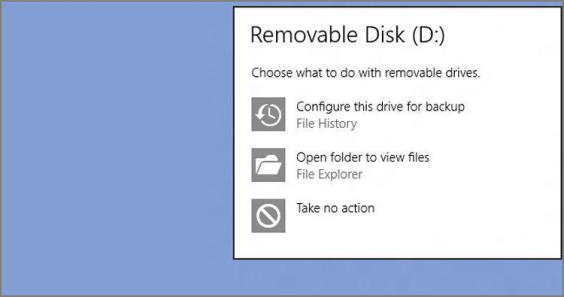
And if you click this notification, you’ll be confronted by the user interface in Figure 3‑37, though the options you see here will vary from device to device.
Figure 3‑35: Printer settings
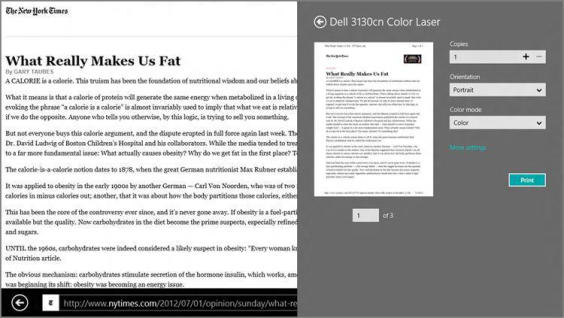
Figure 3‑36: Auto Play for portable storage
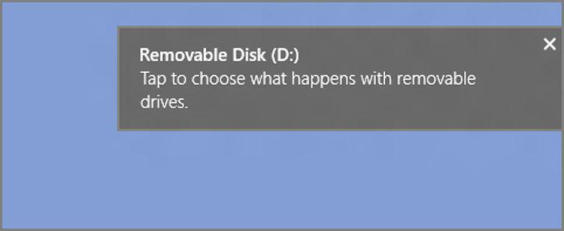
Figure 3‑37: Deciding what to do when this type of device is plugged into the PC
As is the case with desktop applications, this storage is now available to any Metro‑style app as well. You can see this for yourself in apps that support the Metro‑style File Picker, a new full‑screen experience for selecting files on disk. As you can see in Figure 3‑38, a USB‑based hard drive is automatically available to the File Picker just as it is to Windows Explorer on the desktop.
Figure 3‑38: External storage is available to Metro‑style apps too, via the File Picker, a sort of Metro “Open File” interface.

Using a Second Screen
When you plug a second display into your PC, you can choose between a variety of display modes, including duplicating the display on both screens, extending the display across the screens, or using only one of the two screens. In earlier Windows versions, finding and then configuring this feature was fairly ponderous. But Windows 8 provides a handy new Metro‑style experience that makes this easier than ever.
You can press Winkey + P to jump directly to the Second screen pane.
To see it, make sure you have a second display attached to your PC. Then, access the Devices charm (Winkey + K) and select Second screen. You’ll see the Second screen pane appear as in Figure 3‑39.
Дата добавления: 2015-05-13; просмотров: 1272;