Snap: Side‑by‑Side Apps
The new Metro environment in Windows 8 is designed for apps that run full screen, similar to how smartphone and tablet device apps work. But Windows 8 kicks things up a notch by offering a special side‑by‑side mode in which two apps can share the screen, albeit in limited ways. And one of those two apps can be the desktop, which is why we’re discussing it here.
Yes, we’re sure this name is an allusion to the Aero Snap window docking feature that debuted in Windows 7 and is still available on the Windows 8 desktop.
Sadly, side‑by‑side display sharing is not particularly customizable. You can have just two apps, and the one that is considered the primary app takes up about two‑thirds of the available on‑screen real estate. Meanwhile, the secondary app is stuck with just one‑third, roughly, of the available space. Apps that are side by side in this fashion are said to snap into place.
Confused? A picture will make things clearer. Consider Figure 4‑10, in which Microsoft’s Calendar (Metro‑style) app is snapped next to the Windows desktop.
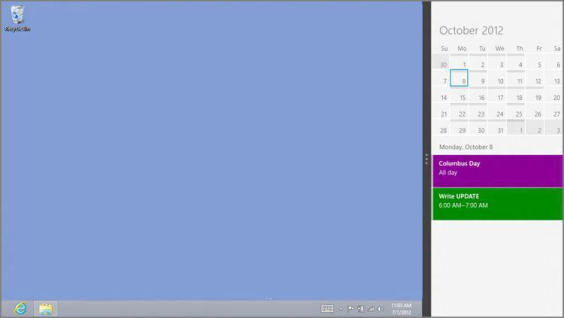
That configuration in the previous figure is one of two possible ways in which a snapped, or secondary, app can be snapped in place next to another app. The other, of course, has the snapped app placed on the right side of the screen, as shown in Figure 4‑11. Which side you use is a matter of taste.
Figure 4‑10: You can snap Metro‑style apps next to the desktop.
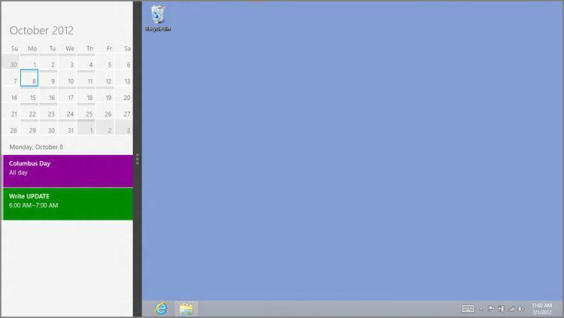
Figure 4‑11: You can also snap Metro‑style apps to the right of the desktop.
So why would you ever want to snap the desktop? The best reason we’ve seen is to monitor a download that’s occurring in a desktop‑based web browser. But frankly, it’s not very useful otherwise.
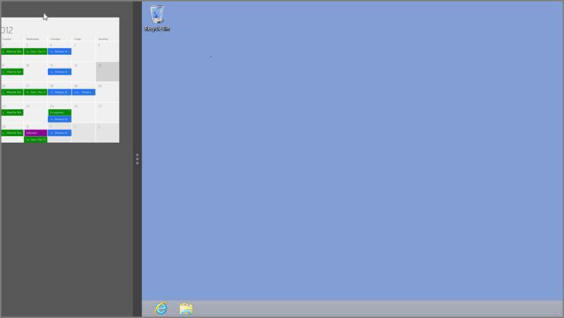
Conversely, it’s also possible for the Windows desktop to be the snapped, or secondary, app. However, when you enable this view, as in Figure 4‑12, you’ll notice that the snapped desktop only displays thumbnails of the available open windows and isn’t too useful.
Figure 4‑12: You can even snap the desktop.
NOTE
One interface you can’t snap is the Start screen. And to be honest, such a capability would be truly useful, since it could provide a snapped list of tiles with live updates. Maybe in Windows 9.
Using Snap to Place Apps Side by Side on the Desktop
The new side‑by‑side app mode can be enabled in various ways, but here are some instructions for the common input types. In each case, it’s best to launch the app you intend to use in the secondary, or snapped, mode first and then launch the app you intend to use as the primary app. Then you can use one of the following techniques to enable the snap mode:
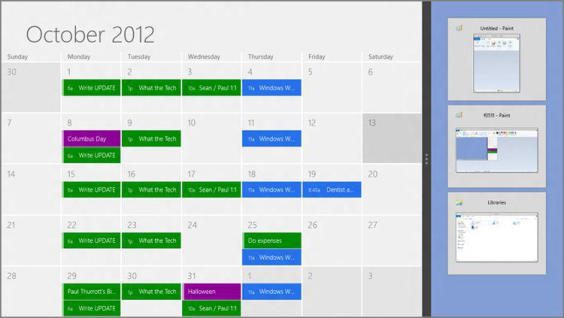
• Mouse: Move the mouse cursor to the upper‑left corner of the screen to display the Back thumbnail. Then, while holding down the mouse button, drag the thumbnail downward. It will turn into a larger, floating thumbnail, as shown in Figure 4‑13, and the side‑by‑side Snap bar will appear.
Release the mouse button to snap the app into the Snap area on the left.
While there is no keyboard‑based shortcut for enabling side‑by‑side mode, as you’ll discover next, there are keyboard shortcuts for modifying the presentation of side‑by‑side apps.
• Touch: Swipe in from the left edge of the screen. As you do so, the previous app in the Back stack will appear as a thumbnail image under your finger. Stop moving your finger and the side‑by‑side Snap bar will appear. When it does, release your hold on the screen and the secondary app will snap in place.
Figure 4‑13: You can drag a previous app off Back or Switcher and then snap it in place alongside the desktop or another primary app.
Customizing Side‑by‑Side Mode
Once you’ve got two apps snapped into position in side‑by‑side mode, you can further customize the display, albeit in fairly limited ways. Here are the options available at your disposal:
• Snap to the right instead: While many are happy to snap a secondary app to the left side of the screen, some will prefer the snapped app to appear on the right. While performing the snap operation, simply drag the app thumbnail to the right side of the screen instead of down and to the left.
If you’ve already snapped an app to the left side of the screen and would like it to appear on the right side instead, the easiest way to do so is via a mouse: Just move the mouse cursor to the top edge of the snapped app, and when the cursor changes into a small hand, grab the app and then drag it to the right side of the screen. With a keyboard, you may find it easier to simply close the snapped app, as described shortly, and just redo the snap action and place it on the right instead. But the convoluted way in which you can do this goes like so: Press Winkey + . (period) three times to snap the secondary app to the right. Then press Alt + Tab (or Winkey + D) to return the desktop to the primary display area.
• Swap the snapped and primary apps: Press Winkey + J to swap the snapped (secondary) and primary apps on‑screen. Or via touch or mouse, simply drag the Snap bar toward the other side of the screen, letting go before you hit the screen edge.
• Close the snapped app: If a secondary app is snapped on the left, press Winkey + Shift + . (period) to close the snapped app. Otherwise, press Winkey + . (period). You can close the snapped app via touch or mouse by dragging the Snap bar to the closest screen edge.
NOTE
Side‑by‑side screen sharing is more interesting for those who wish to stick with Metro‑style apps, and we cover this feature in Chapter 3 as well as a result. But it’s worth mentioning here, because the desktop is considered an app, too, and can participate in this task management solution. Certainly, some apps will work well in this snapped mode, even when used in tandem with the desktop.
Charms
In Windows 8, Microsoft exposes many system‑level services through a new user experience called Charms. These Charms are accessible via a bar that appears on the right edge of the screen in a manner that is consistent across every user experience in Windows 8, including the Start screen, all Metro‑style apps, and the desktop. This can be seen in Figure 4‑14.
Дата добавления: 2015-05-13; просмотров: 1107;