Metro‑Style Apps on Netbooks: A Workaround
If you want to run Metro‑style apps on your Netbook, there is a fix, as it turns out. But be warned that modifying a Windows 8 install to allow Metro‑style apps to run will cause the desktop environment look a bit skewed, or squished. But if your goal is to enjoy Metro, this will do the trick.
Run the Registry Editor, Regedit (Start Search, regedit ), and search for the term display1_downscalingsupported (using Ctrl + F). Find each instance of this entry and change its value from 0 to 1. (Use F3 to repeat the previous search.) Do this until you’ve found them all, close Regedit, and reboot.
You will now have additional resolution options, such as 1024×768 and 1152×864. If you do have multiple resolution choices, try each (that’s above 1024 x 600) to see which looks best. But either way, Metro apps will now work.
More Efficient Multi‑Monitor
While previous versions of Windows offered only basic multi‑monitor capabilities, Windows 8 addresses past issues and adds some unique new features that let you customize how you can view the Metro and desktop environments side by side on multiple displays.
NOTE
First, a general rule: While it’s possible to span your desktop across multiple displays, the Metro environment can only appear on a single screen. So if you have a four‑monitor system for some reason–perhaps you’re James Bond or are a little too excited about flight simulator games–you can have this setup configured in one of two basic ways: one screen showing Metro and three showing the desktop, or all four screens showing the desktop.
Given this limitation, let’s look at some of the ways in which you can configure your PC for multi‑monitor use in Windows 8.
Basic Multi‑Monitor Configuration
There are two interfaces you will use to configure a multi‑monitor setup. The most basic is the Metro‑based Second Screen pane, which replaces the old “presentation” mode from previous Windows versions. You can access this screen, shown in Figure 5‑29, in several ways.
Figure 5‑29: The Second Screen pane

The simplest, we think, is to use the Winkey + P (where P = “presentation”) keyboard shortcut. However, you can also find this interface via touch or mouse by displaying the Charms bar and choosing Devices and then Second Screen.
While it is clearly aimed at those who need to project a presentation to a secondary screen or projector, the Second Screen pane will meet the needs of many users who have two screens attached to their PC, including laptop or tablet users who dock their device at home or work in order to use a larger screen.
This pane lets you configure the screens as follows:
• PC screen only: In this mode, the second screen is simply ignored and only the PC’s primary display is used.
• Duplicate: In this mode, the second screen duplicates, or mirrors, the primary display. There are some limitations here based on the capabilities of the screen. For example, the mirrored screens will both utilize the resolution of the lowest resolution screen of the pair. This is a common choice for those giving presentations who wish to see the same display as the audience.
• Extend: In this mode, the PC display is extended across the two screens. This common configuration allows you to have a desktop that spans two screens or a configuration in which you use Metro on one screen and the desktop on the other. Unlike with Duplicate, each display will use its own native resolution. Presenters can also utilize this mode with the Presenter mode in recent versions of Microsoft PowerPoint.
• Second screen only: Here, the main PC display (on a laptop or tablet, the display that’s built into the device) will be disabled and only the secondary screen is used. This is a common choice for those with portable computers who wish to use a docked display, keyboard, and mouse while not moving around.
More Advanced Multi‑Monitor Configuration
The Second Screen interface is fine for basic usage, but if you have more than two screens or need to configure how the screens work, you’ll need more control. And that comes via a legacy control panel called Screen Resolution. Shown in Figure 5‑30, this control panel can be accessed by right‑clicking the desktop and choosing Screen Resolution, or via Start Search (screen resolution ).
A number of configuration options are available here, including the following:
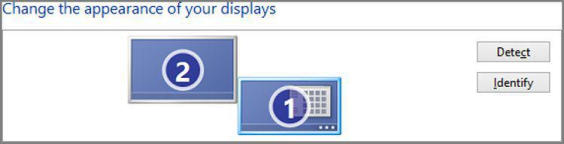
• Visual positioning and orientation of the displays: You can move the graphical representations of the displays in the window to approximate how the physical displays they represent are in fact oriented in real life (Figure 5‑31). Because you will need to move the mouse cursor from screen to screen, it makes sense to line up the displays so that they work onscreen as they do in real life.
Of course, anyone using a multi‑monitor setup can probably remember a keyboard shortcut, too: Winkey + C. This shortcut opens the Charms bar so you don’t have to use the mouse.
You may recall that Windows 8 utilizes the corners of the primary screen as “hot corners,” which are required by Metro interfaces such as Back, Start, and Charms. Fortunately, Microsoft has configured Windows 8 such that if a corner of the primary display is lined up exactly with a corner of a secondary display, that corner will become “sticky,” and the mouse cursor will hard stop when it reaches such a corner. This feature prevents you from accidently overshooting the hot corner, moving the cursor to the next display, and missing out on the Metro feature you meant to trigger.
Figure 5‑30: The Screen Resolution control panel provides more fine‑grained control over multiple displays.
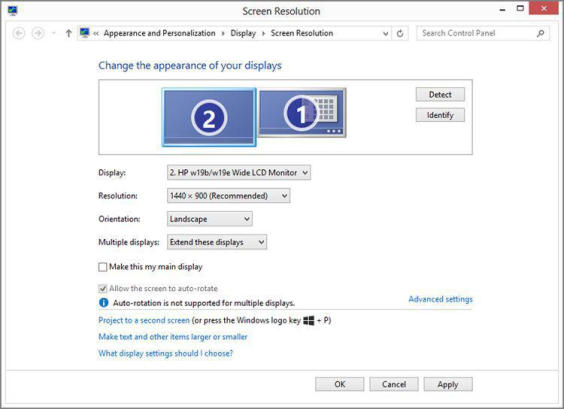
Figure 5‑31: You should orient the onscreen displays to mirror how the displays line up in real life.
• Set screen resolutions: Using the Resolution drop‑down, you can ensure that the resolution of each display is set correctly to the optimal resolution (generally the highest possible resolution, or the display’s “native” resolution). Select a display in the graphical representation area first and then make sure the resolution is correct.
• Orientation: You can choose between landscape, portrait, landscape (flipped) and portrait (flipped) orientations, which can be handy for those displays that can be rotated.
• Multiple displays: This drop‑down works much like the Second Screen pane described in the previous section. It lets you choose between the same four options, though they are annoyingly described somewhat differently: Duplicate these displays (Duplicate), Extend these displays (Extend), Show desktop only on 1 (PC screen only), and Show desktop only on 2 (Second screen only).
Fine‑Tuning Multi‑Monitor Configuration
OK, you’ve got your multiple displays configured and oriented the way you like. But what about the desktop wallpaper and taskbar? By default, Windows 8 will simply duplicate both the wallpaper and taskbar across two or more displays, even if you’ve chosen the Extend view, which extends the desktop across the multiple displays. Wouldn’t it be nice if you could extend a panoramic wallpaper across the displays, or use a different picture for each display? And what about having the taskbar be unique to each display so that, say, the taskbar on the second display only shows buttons for the windows that are actually open on that display?
Yep, you guessed it. You can configure how each of these features works, too.
Configuring the Desktop Background to Span Multiple Displays
To configure the desktop background for multiple displays, you will use the Desktop Background control panel, which is accessible through the Personalize control panel (right‑click the desktop, Personalize, and then Desktop Background) or directly from Start Search (desktop background ). In this interface, shown in Figure 5‑32, you can click the Picture location drop‑down to choose between a variety of background types.
The Span option lets you span a single image across multiple displays. This works best, of course, with panoramic images, and while you’re free to make your own, Microsoft is stepping up by providing panoramic wallpapers (and even desktop themes, which also include other unique configurations) that are designed specifically for this use.
Some are included in Windows 8. To see what’s available, select Windows Desktop Backgrounds from the Picture location drop‑down near the top of this window. There, you’ll find a few panoramic options that, when selected, span nicely across two displays as in Figure 5‑33.
Figure 5‑32: Desktop Background control panel
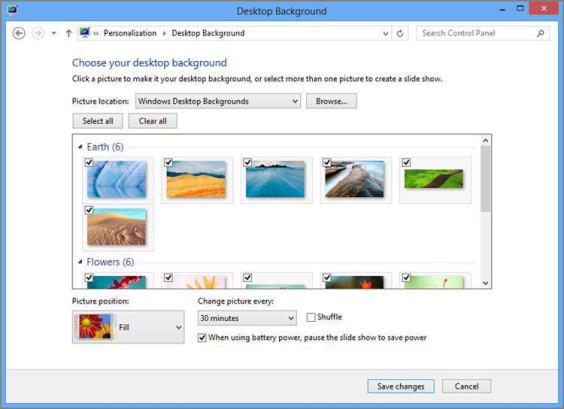
Figure 5‑33: With a panoramic background picture, you can create a seamless display across multiple monitors.

Be sure to select Span from the Picture position drop‑down as well to see the effect correctly. It also helps if the displays are lined up properly, since otherwise the picture will stagger from screen to screen.
In case it’s not obvious, all desktop themes designed for Windows 7 still work the same with Windows 8, too.
Note that Microsoft is also making panoramic wallpapers and themes available from its Windows Personalization Gallery website at windows.microsoft.com/en‑US/windows/downloads/personalize. This collection is updated regularly, so be sure to check it out from time to time.
Configuring a Different Background Picture for Each Display
Another choice is to use a different background picture for each display. This is absolutely possible in Windows 8, though it’s not particularly obvious.
It can’t be a solid color for some reason.
To do so, navigate to the Desktop Background control panel. (Again, via Personalize and then Desktop Background or from Start Search, with desktop background ). Select a (picture) location from the Picture location drop‑down list and then select the picture you want for the first display. Then, right‑click that picture and choose Set for monitor 1, as shown in Figure 5‑34.
Figure 5‑34: Specifying a background picture for the first display only
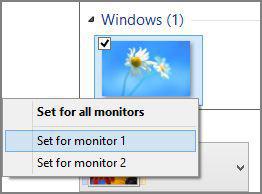
Then, find the picture you want for the second display, right‑click it, and choose Set for monitor 2. Repeat as necessary for further displays.
Configuring the Taskbar for Multiple Displays
By default, the taskbar will duplicate on each display even if you’ve chosen the Extend option. But you can change this so that the taskbar on each screen is specific to that screen. To do so, right‑click an empty area of the taskbar (any screen will do) and choose Properties. You’ll see the Taskbar Properties window shown in Figure 5‑35.
There are four possible configurations for the taskbar on a PC with multiple displays:
• Duplicated across all displays: By default, the same taskbar will appear on all displays and its collection of buttons will be duplicated on each. That is, the taskbar on each display will be identical.
• Taskbar only on the primary display: If you’d like to display the taskbar only on the primary display, uncheck the option titled Show taskbar on all displays in Taskbar Properties. This will eliminate the taskbar on all secondary displays, and display it only on the first, or primary, display.
Figure 5‑35: New to Taskbar Properties: a way to control how the taskbar works with multiple displays
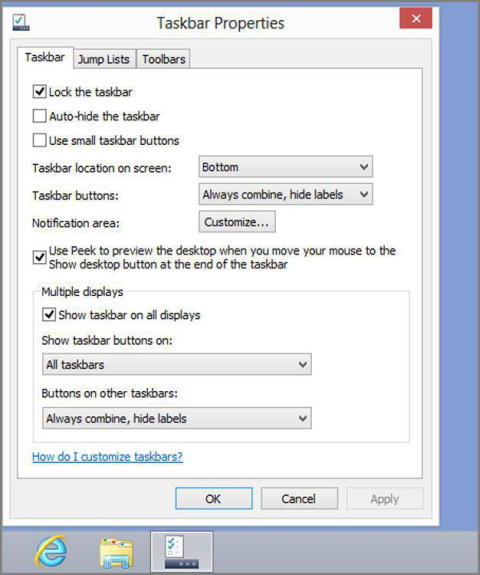
• A unique taskbar on each display: If you’d prefer to have a taskbar on each display but would like each to hold buttons (shortcuts for running and non‑running programs) that are specific only to that display, choose “Taskbar where window is open” from the Show taskbar buttons on drop‑down. In this configuration, the secondary displays will only display buttons for windows and applications that are open on that screen.
• A unique taskbar on each display, but all open windows available on primary display, too: This most confusing of options is basically identical to the previous configuration, but with a twist: Open windows and applications will display a button on the taskbar of both the display they’re open on as well as the primary display.
Configuring Metro for Multiple Displays
You may recall that you can only use the Metro environment on one display. The question is: Which display?
As it turns out, there’s no user interface for specifying which display is used for Metro, and of course it uses the primary display, or what’s sometimes referred to as Monitor 1, by default. You can, however, change which display Metro uses. As is so often the case, you just need to know the trick.
The only issue with this tip is that it’s not persistent across reboots. Metro will stay on the secondary display until you reboot, but once you do, you’ll need to perform this drag‑and‑drop operation again.
To switch Metro from the primary display to a secondary display, you need to launch any Metro‑style app. That is, you cannot do this from the Start screen. Once you have a Metro‑style app running, “grab” the top of the app via touch or mouse–the cursor will change into a gloved hand cursor if you’re using the mouse–and then drag the app to the display you prefer.
Дата добавления: 2015-05-13; просмотров: 1297;