Using Wi‑Fi Networks
Wireless networks, of course, require a bit more finesse. Unlike wired networks, they’re not assumed to be safe, since you could be connecting to the Internet from a café, airport, or other location where electronic predators are lurking, waiting to steal your valuable personal information directly from the airwaves. Furthermore, not all wireless networks were created equal: There are wide‑open, unprotected wireless networks and protected networks that offer various levels of security. But even the various types of networks aren’t completely safe, so it’s best to err on the side of safety, which is exactly what Windows 8 does.
To connect to a wireless network, you display the Networks pane. As described previously, you can do so by clicking the Network icon in the Notification Area or by typing Winkey + I and then clicking the Network icon in the Settings pane that appears. As you can see in Figure 13‑3, when you’re within in range of one or more wireless networks, those networks will appear listed in the Networks pane under the heading Wi‑Fi.
You will see two types of wireless networks here: unprotected and protected. An unprotected network is noted with a small exclamation point emblem to indicate that it could be unsafe. And as shown in Figure 13‑4, when you select this type of warning, Windows provides a final warning before you connect.
Figure 13‑3: Available wireless networks are displayed in the Networks pane.
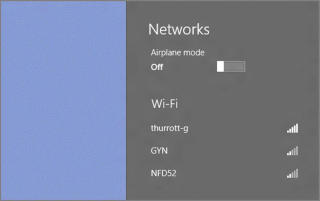
Figure 13‑4: Windows 8 warns before letting you connect to an unprotected wireless network.
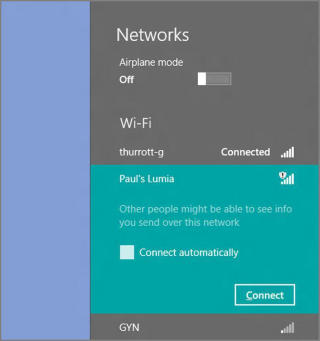
Connect automatically is deselected by default for open, unprotected networks and selected for password‑protected networks.
Regardless of the protected status of the network, you’ll see two other choices when you select a wireless network in the Networks pane: Connect and Connect automatically. If you check the latter option before connecting, Windows 8 will automatically connect to this network whenever it’s within range. (If there are two or more such networks, Windows 8 will intelligently select the one with the best connectivity.)
Once you click Connect, one of two things can happen.
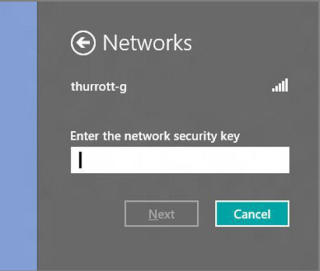
For a password protected network, you’ll be prompted to enter the password, as shown in Figure 13‑5, and then Click Enter.
Figure 13‑5: You need to enter a password for a protected network.
If you are accessing an open, unprotected network, the Networks pane will ask you whether you want to turn on sharing between PCs and connect to devices on this network. (For protected networks, this is the next step.) As with any other network type, there are two possible answers:
• No, don’t turn on sharing or connect to devices. For networks in public places.
• Yes, turn on sharing and connect to devices. For home or work networks.
Mouse over a connected network and Windows will provide information about the type of the network (for example, 802.11g or similar for wireless networks) and the type of security it uses, if any.
Choose accordingly, and you’ll be connected to the network. In the Networks pane, the connection will be accompanied by a Connected notation.
Wireless networks provide many more configuration options than do wired networks. If you right‑click a wireless network to which you’re connected, you’ll see a number of options, though it should be noted that not all of them are relevant to Wi‑Fi networks. (Some are more applicable to cellular data connections, as described in the next section.) These options include:
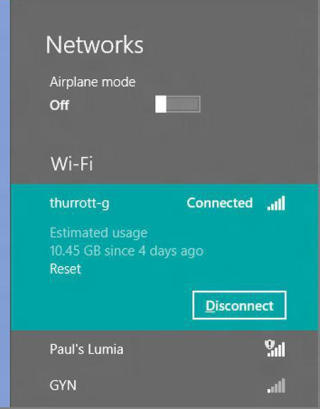
• Show/Hide estimated data usage: This option is actually a toggle. When it’s enabled, you’ll see a data usage estimate whenever you select the connection, as shown in Figure 13‑6.
Using this information to keep track of usage is, of course, valuable for cellular data connections, which are always metered. You can click the Reset link in the Networks pane to reset the data usage estimate to 0.
Figure 13‑6: Keep track of your data usage.
• Set as metered/non‑metered connection: This option changes the behavior of certain connected Windows features when enabled. Since it’s more typically needed for cellular data networks, we’ll discuss this feature in the next section.
• Forget/Remember this network: If you’ve configured Windows 8 to remember a wireless network and thus reconnect to it automatically, you can change that behavior using this option (and vice versa).
• Turn sharing on or off: This option displays the same interface described previously, letting you choose between enabling and disabling PC sharing and device connections.
• View connection properties: Choosing this option displays an old‑school desktop‑type configuration window like the one shown in Figure 13‑7. This interface lets you configure advanced settings for obscure, non‑typical wireless networks and isn’t generally needed.
Дата добавления: 2015-05-13; просмотров: 1266;