The Most Basic Storage Spaces Configuration of All: One Disk, One Space, No Resiliency
The simplest possible Storage Spaces configuration involves just one (additional) disk, which you will use to create a single storage pool that can then be divided into one or more storage spaces; we’ll use one to keep things simple.
After you’ve added the disk and verified that it’s working in File Explorer, you need to access the Storage Spaces control panel, the Windows 8 user interface for managing this feature. As a classic Control Panel, Storage Spaces is well hidden, but you can find it easily enough by using Start Search (look under Settings, not Apps) or, if you’re more of a desktop kind of person, by using the power user menu or some other means to launch Control Panel and the search from there.
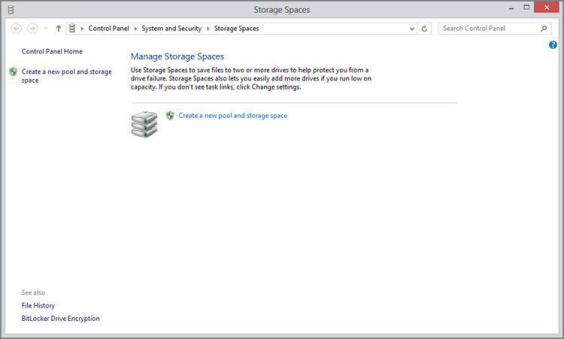
However you do it, Storage Spaces will resemble Figure 11‑3 when launched the first time, regardless of how many additional disks are attached.
Figure 11‑3: The Storage Spaces control panel
The new pool creation process is destructive, meaning that any data on a non‑pooled (that is, normal) disk will be deleted as part of the process. You can think of this as formatting the pool, if that helps it make sense.
Click the link titled Create a new pool and storage space. After a User Account Control prompt–you don’t want the commoners mucking around with storage, now–you’ll be presented with the display shown in Figure 11‑4. Here, Storage Spaces has found a single viable disk and is offering to let you use this device to create a new storage pool.
The Take offline link removes the drive letter from that storage device. You can do this to recover that drive letter, which you may wish to use for the space you’re about to create.
Figure 11‑4: Creating a new storage pool with just one physical disk
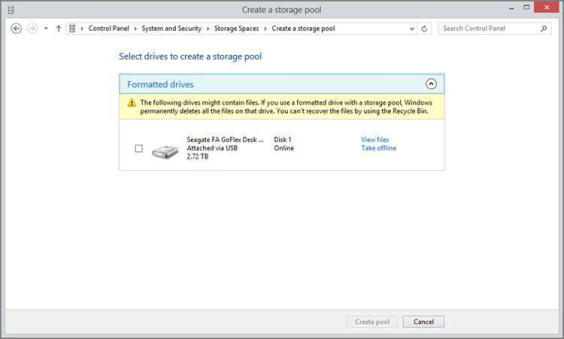
To add the disk to a new pool, select it (by clicking the empty check box next to the disk) and then click Create pool. A new pool is created and then you are prompted to create a storage space that will exist in that pool. Unlike a pool, a storage space has a name, a drive letter assignment, and a resiliency type, and it can reserve more storage than is physically available. All of these capabilities are configured in this screen, which should resemble Figure 11‑5.
Figure 11‑5: After the pool is created, it’s time to create a space within that pool.

For a one‑disk configuration, the choices are fairly limited: You can assign a name and drive letter of your choosing, but the only resiliency type you can use is “Simple (no resiliency),” which for some reason is not automatically selected. (The other options require two or more attached disks.)
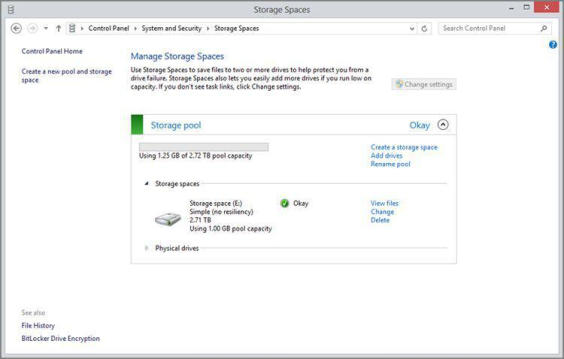
So select “Simple (no resiliency)” from the Resiliency type drop‑down and then click the Create storage space button. Storage Spaces creates your new storage space and returns to the main Storage Spaces’ control panel view, which will have changed, as shown in Figure 11‑6, to include the details about your new storage pool and the single space it contains. (Additionally, a new Explorer window will open, showing the virtual partition that represents your new space.)
You can also expand the physical drives area to see the one‑to‑one representation between the actual drive and the space for which it is being used. Obviously, this capability gets more interesting–and useful–when you create a space with two or more physical disks.
Figure 11‑6: One storage space with a single contained storage pool
Дата добавления: 2015-05-13; просмотров: 1511;