Dual Boot
While most users will want just a single version of Windows installed on their PC, some power users or others will require two (or more) installs of Windows, which sit side by side on the PC’s hard disk in separate partitions. When you boot the PC in such a configuration, you’re presented with a menu listing the various OS choices, and you pick one and boot into the appropriate OS version.
Such a configuration is often called a dual‑boot configuration, though of course it’s possible to install three or more OSes, assuming you have the disk space. (Maybe multi‑boot is a better term.) But however many versions of Windows you wish to install, the basic advice is simple: Install them in order of age, from oldest to newest. If you want to dual‑boot between Windows 7 and Windows 8, for example, install Windows 7 first and then Windows 8.
Why is this, you ask? Each Windows version comes with an updated version of the Windows boot loader, which includes both the menu that users will see and the underlying code that selects which OS to boot. The Windows 7 boot loader is not familiar with Windows 8. But the version for Windows 8 is very much familiar with Windows 7, and with older Windows versions. So install that last.
Assuming you have a Windows 7 install up and running already, you must use a media‑based Setup to install Windows 8 after booting the PC from that disc or USB flash drive. That is, you cannot use the web‑based installer.
Getting the PC Ready for the Second OS
Before you do that, however, there is one absolutely critical task you must perform: You must make room for the new Windows 8 install. This can occur on its own disk, so if you have one sitting in the PC waiting to go, you’re all set. But if you have just one hard disk, as in a typical laptop, you’ll need to segregate it into separate partitions, segments of the disk that work and act like individual hard disks. And to do this, you must use a fairly complex and well‑hidden tool called Disk Management.
To find this tool from Windows 7, use Start Menu Search: Open the Start Menu, type disk part , and hit Enter. The Disk Management utility, shown in Figure 2‑21, will open.
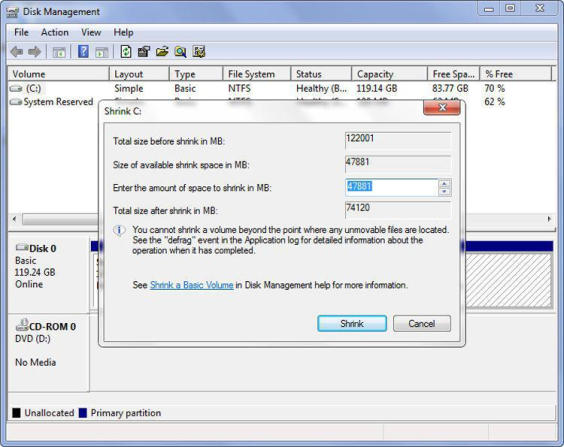
On a single disk PC, you must select the partition on which Windows 7 is installed–it’s almost always the C: drive–right‑click it, and choose Shrink Volume. In the Shrink window, shown in Figure 2‑22, enter the amount of space to shrink the partition in MB. This space will be used for the Windows 8 partition, which you’ll create next.
Figure 2‑21: Disk Management

Figure 2‑22: Use the Shrink tool to resize your Windows 7 partition and make room for Windows 8.
Then, click the Shrink button.
Back in Disk Management, you’ll see the new empty disk space you just created. Right‑click this and choose New Simple Volume. Step through the wizard, give it all the available space, assign it a drive letter, and be sure to assign it an obvious name, like Windows 8 .
Installing Windows 8 Alongside Windows 7
Now you’re ready to install Windows 8 in a dual‑boot configuration. Reboot the computer, and boot it using the Setup media you previously acquired or created.
In Windows Setup, there are two critical points where you must choose correctly:
Install type: You will be prompted to choose between Upgrade and Custom install types. You must choose Custom here, since you are not upgrading Windows 7 and are instead clean installing Windows 8 alongside Windows 7.
Where do you want to install Windows? In the next Setup step, you will be asked to pick a partition or hard drive on which to install Windows 8. You cannot install Windows 8 to the same partition or hard drive to which Windows 7 is installed . Instead, you must choose a different partition or hard drive. So choose the partition you created earlier.
Windows 8 will install normally and eventually boot into the new OS.
Choosing Between Windows 7 and Windows 8 at Boot
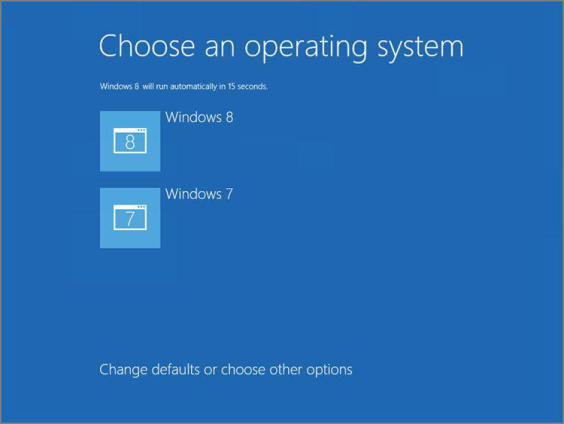
By default, your PC will boot into the most recently‑installed OS, which in this case is Windows 8. But it will briefly stop at a new boot menu, which gives you the opportunity to choose the OS at boot time. This menu will resemble Figure 2‑23 and will contain entries for both Windows 8 and Windows 7.
This menu only displays for several seconds, so you need to think quick if you want to change from the default boot choice. (Or simply tap an arrow key on the keyboard to stop the countdown.)
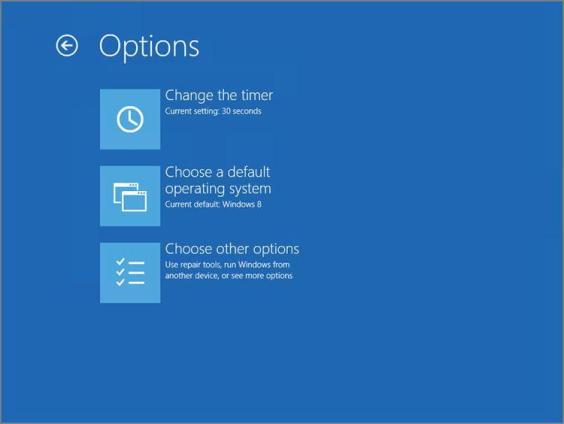
You can configure this boot menu by clicking Change defaults or choose other options. When you do so, you’ll be presented with the screen shown in Figure 2‑24.
The following options are available:
• Change the timer: By default, the boot menu only appears for 30 seconds (which, frankly, is reasonable). Here, you can change this to other time limits, including 5 minutes or 5 seconds.
• Choose a default operating system: By default, your PC will boot into the most recently installed OS if the menu timer expires. With this option, you can choose a different Windows version as the default.
• Choose other options: This option triggers the Windows 8 recovery tools menu, which we discuss in Chapter 11.
Figure 2‑23: The Windows 8 boot menu
You can also modify this boot menu a bit from within Windows 8 (but not from within Windows 7). Of course, you may be wondering: Why bother? Well, this other interface provides a bit more fine‑grained control over the boot options, especially for the boot menu timer.
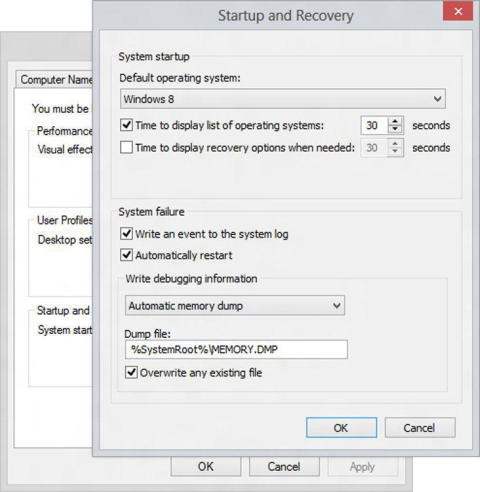
To access these capabilities, you have to find a very well‑hidden Startup and Recovery interface that’s available via the classic System control panel from previous Windows versions. There are numerous ways to find it, but the easiest, as always, is Start Search: Look for system , select Settings, and then choose System from the results list. In the System window, click Advanced system settings on the left, then select the Advanced tab of System Properties. And then click the Settings button in the Startup and Recovery section. (Whew!)
Figure 2‑24: The Options screen for the Windows 8 boot menu
You’ll be presented with the window shown in Figure 2‑25.
Figure 2‑25: You can configure Windows 8 boot options from this well‑hidden interface.
You can also use this interface to enable the recovery options at boot time if you’d like. Generally speaking, this isn’t advisable, but if you’re having issues with the computer, it’s not a bad idea to have this capability at the ready.
From this window, you can configure the following boot menu options:
• The default operating system: It will be Windows 8 initially, but if you prefer it to default to Windows 7, this is the place.
• The time to display the list of operating systems: By default, the Windows 8 boot menu will display for 3 seconds. Here, you can change the value to any number of seconds you like.
Дата добавления: 2015-05-13; просмотров: 1124;