About Libraries
Microsoft introduced libraries in Windows 7, providing a new way to collect related content–documents, music, photos, and videos by default–in virtual folders that are really views to two or more physical folder locations on the PC. Libraries continue in Windows 8 largely unchanged, and Microsoft provides the same four default libraries–Documents, Music, Pictures, and Videos–as it did in the previous OS version. Likewise, each library aggregates the same two physical folders as in Windows 7, in default. So in the case of the Pictures library, that means the My Pictures folder that’s part of your user account and the Public Pictures folder.
This is all a long way of saying that Windows 8’s basic photo management features haven’t changed since Windows 7.
Depending on how you’ve configured your Microsoft account, some of these sources will and will not be immediately available. The Pictures library is always available, online or off, and will include whatever photos and other pictures you store in your Pictures library. And your SkyDrive source should be automatically configured since your Microsoft account comes with access to SkyDrive storage.
But the other sources, Facebook, Flickr, and your connected PCs, may or may not be configured and available. If you took the time to associate your Facebook account with your Microsoft account, this source will be set up and ready to go. But if not, you can do so now from within Photos. And the process for configuring this account to work with Photos is similar to that for Flickr, which has to be performed manually regardless of how you’ve configured your Microsoft account. So let’s examine that first.
Configuring Facebook or Flickr Photos
To manually configure Facebook–remember, the process is also very similar for Flickr–to work with the Photos app, you will need to visit the app’s Settings pane. To do so, tap Winkey + I. (Or, with a touch or mouse interface, display the Charms bar and then select Settings.) The Settings pane should resemble Figure 9‑3.
Figure 9‑3: Photos Settings
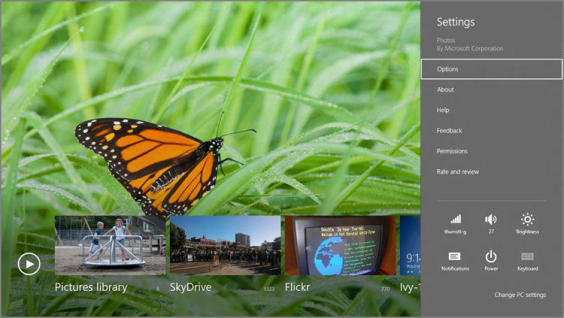
Select Options to display various options related to Photos. Next to both Flickr and Facebook, you will see a link titled Options. Click the link for the service you wish to configure. (We’re using Facebook in this example, but the process is very similar for Flickr.)
Photos will pass you through to the web‑based Facebook authentication site using Internet Explorer. Here, as shown in Figure 9‑4, you will authorize Photos to use your Facebook account.
Figure 9‑4: Configuring Photos to work with Facebook
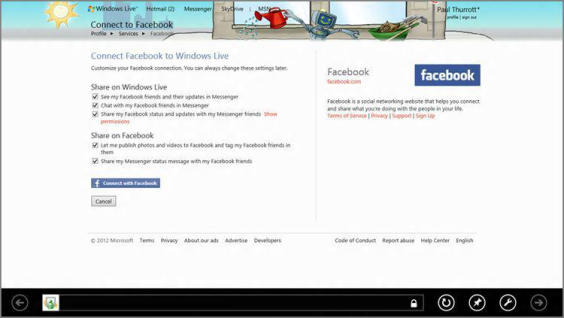
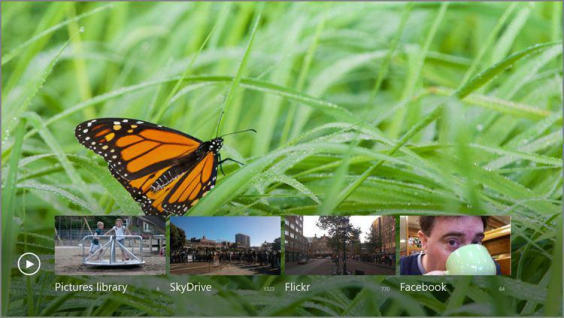
Click Connect with Facebook to connect the Facebook service to the Photos app. Once you’ve provided your Facebook credentials, Microsoft will link the two accounts and you can return to the Photos app. When you do, you’ll see that a new Facebook tile has been added to the app, providing you with access to the photos from that service (see Figure 9‑5).
Figure 9‑5: Facebook is now available in Photos.
If you don’t use Facebook or Flickr, you can actually remove these tiles from the Photos home screen. We describe this process a bit later in the chapter.
Again, the way you configure Photos to work with Flickr is identical to what we just discussed. So if that’s required, you can connect to your Flickr account in the same fashion.
Using SkyDrive to Connect to Other PC Photo Libraries
By this point, you should have Photos configured to work with some combination of your local photos, SkyDrive‑based photos, and possibly your Facebook and Flickr‑based photos as well. That’s a lot of photos. But most people have two or more PCs, and if you configure these PCs a certain way, you can actually access the photo collections on your other PCs–or what we call your connected PC–from any of your PCs.
This assumes that the PCs in question are online, of course. If a connected PC is off or asleep, you won’t be able to access its pictures from the Photos app. On the good news front, these other PCs don’t have to be on your home network to work: One could be in Singapore, for example, and one in Boston, Massachusetts, and you’d still be able to make the connection as long as they’re both online.
So how do you connect PCs? There are two requirements:
• Microsoft account: You must configure each PC to sign in with the same Microsoft account.
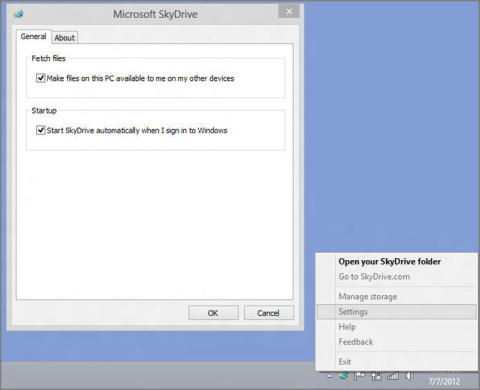
• SkyDrive application for Windows: You must install the SkyDrive application for Windows (not to be confused with the Metro‑style SkyDrive app for Windows 8) on each PC and configure that application to use a feature called Remote Fetch. This feature makes that PC’s files available to you on your other PCs and devices. You do this through the SkyDrive application’s Settings window, which can be seen in Figure 9‑6, and accessed through the app’s system tray icon.
Figure 9‑6: Make sure the SkyDrive application is configured to share its files with other connected PCs.
When you do configure your PCs to use SkyDrive’s Remote Fetch feature, the photo libraries from those PCs will appear in the Photos app on your other PCs. It’s like magic!
Navigating Through Your Pictures Library, SkyDrive, Facebook, and Flickr
Once all of your photo sources are configured, you can use the Photos app as it is intended: to view your photos , regardless of their location. Well, assuming you’re online, that is: When you’re offline, only the Pictures library tile will respond.
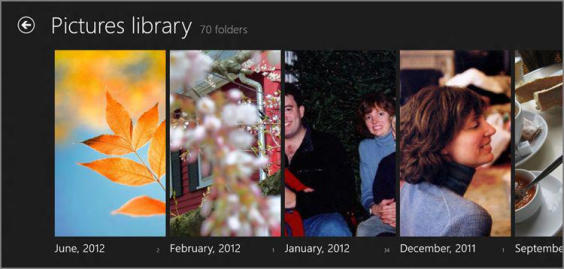
Navigation in each source is similar: You’re presented with a horizontally arranged list of tiles, each of which represents a folder, file, depending on the source. These tiles are in alphabetical order, from left to right, with folders appearing before actual files. Consider the view shown in Figure 9‑7, which displays the contents of the Pictures library.
Figure 9‑7: Viewing folders in the Pictures library
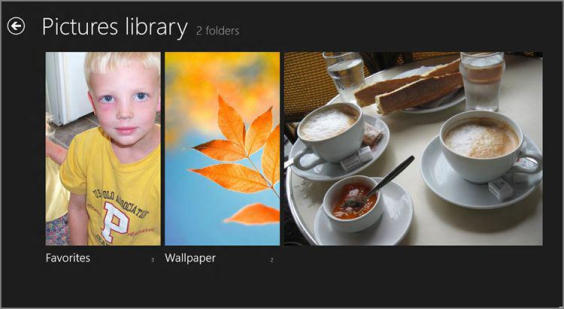
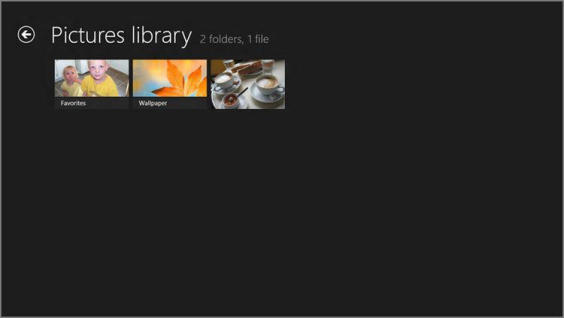
In this view, you can see two folders, which are represented as tall, rectangular tiles and a single photo, which appears in its native aspect ratio. If you find this view constrictive, you can view more folders (and files) simultaneously by using semantic zoom to pan back the view, resulting in the grid‑like layout shown in Figure 9‑8. Obviously, this option–which is available in virtually all Photos views–is more effective (and even necessary) when you have a lot of pictures.
Figure 9‑8: You can zoom out to view more photos on‑screen at once.
You can enable semantic zoom in a variety of ways. With a touch‑based system, you use the suddenly common pinching gesture, with two fingers, directly on the screen. With a mouse and keyboard, you can hold the Ctrl key and use your mouse’s scroll wheel. Or, with just the mouse, click the small minus (“‑”) symbol in the bottom right of the screen.
And if you zoom enough in the correct direction, you can even use this feature to zoom into a photo! (If you do, you can use the small plus (“+”) symbol that appears in the lower right to zoom back out as well.
These basic views are true of all the photo sources, but of course each is a bit different in its own way. So here’s some information to consider about each:
• Pictures library: By default, the Pictures library consists of the contents of two locations, My Pictures and Public Pictures, but you can add and remove locations as well. Files and folders in a library are mixed together and arranged as one. So if you have folders named Alpha and Gamma in your My Pictures folder and then one folder named Beta in Public Pictures, they will be arranged alphabetically as Alpha , Beta , and then Gamma in the Pictures library in both File Explorer (on the Windows desktop) and in the Pictures library view in the Photos app.
• SkyDrive: When you access SkyDrive from its normal web interface at skydrive.com, you’re given the opportunity to configure the “type” of each folder. One of those types is Photos. And only folders that are configured as type Photos will appear in the Photos app in Windows 8. So if you’re not seeing certain SkyDrive photos appear, make sure they’re in a properly configured folder.
• Facebook: Everyone’s favorite social networking service organizes photos into albums, and what you’ll see in the Facebook view in Photos will correspond to that. You’ll see common Facebook locations like Cover Photos, Mobile Uploads, Wall Photos, and so on, as well as whatever albums you’ve manually created. The order here, however, is not alphabetical. Instead, they’re arranged by which most recently were accessed.
• Flickr: Yahoo’s popular photo‑sharing service provides users with a Photostream, which is basically just every photo you’ve ever uploaded. But it also provides folder‑like containers, including sets, which can be further grouped into collections. So you might consider these folders and sub‑folders, respectively. Looking at the Flickr view in Photos, you’ll see a tile for your Photostream and then tiles for each collection and set.
• Connected PCs: As with your own Picture library, your connected PCs will present an aggregated list of folders, sorted alphabetically.
Viewing Photos and Photo Slideshows
Each of the supported photo sources provides nearly identical features related to viewing photos and photo slideshows. So you can browse into any source, and eventually you’ll be presented with one or more actual photos, in a folder. At this point, you can perform some basic activities related to individual photos or groups of photos.
To view a photo full‑screen, simply select it. This works exactly as expected, but if you open the app bar (Winkey + Z) while viewing an individual photo, you’ll see some interesting options, as shown in Figure 9‑9.
These options include the following:
• Set as … Lock screen: While you can always use the PC Settings interface to select a favorite photo for your lock screen image, oftentimes you’ll think to do this while actually viewing photos. This menu item, found by tapping the Set as button, lets you do so.
• Set as … App tile: By default, the Photos app tile will shuffle through photos, presenting an animated view. But you can configure a single picture to be the permanent tile image if you’d like.
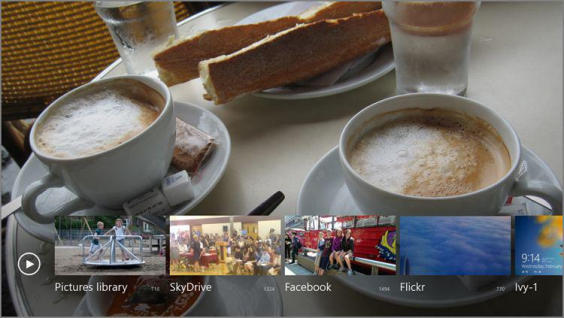
• Set as … App background: As you’ve seen, the Photos app provides a nice photographic background image in its main view. But you’ll probably want to change that to a favorite photo of your own. When you do, this view will change to resemble Figure 9‑10.
NOTE
that this delete button is not available when viewing photos on connected online services or PCs.
• Delete: This button deletes the file from your PC, after a quick confirmation.
• Slide show: This button triggers a slideshow of the photos contained in the folder that contains the picture you’re currently viewing.
Figure 9‑9: A single photo viewed full‑screen
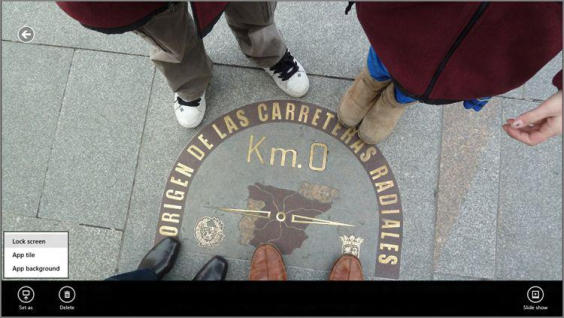
Figure 9‑10: Customizing the Photos app with your own picture.
Of course, you can also trigger slideshows from a folder view, and when you access the app bar from this view, you get a different set of buttons, and thus capabilities. A few are notable.
In this Browse by Date view, you can also reverse pinch to zoom out and see more on‑screen at once.
The first is a Browse by date button, though it only appears in the Pictures library view. When you activate this button, the view switches so that each “folder” tile now represents a month, as in Figure 9‑11. (And there’s now a new Browse by album button in the app bar so you can switch back.)
Figure 9‑11: The Pictures library, viewed by date
This is a neat feature, but it works only within a single source. You can’t mix photos from, say, Facebook and Flickr into a single slideshow. You’ll be prompted to that effect if you try.
There’s also a power‑user feature of sorts that lets you collect photos from different folders (within a single photo source) into a basket, like that in the Metro‑style File Picker, so that you can run a slideshow of photos from different locations.
To use this feature, enter a folder or view that contains photos. Then, select individual photos, as you would when selecting Start screen tiles: by right‑clicking them, tapping and dragging down a bit, or by pressing the Spacebar; as you select a photo, a selection rectangle will indicate success. Or you can select every photo in a folder by opening the app bar and pressing Select All.
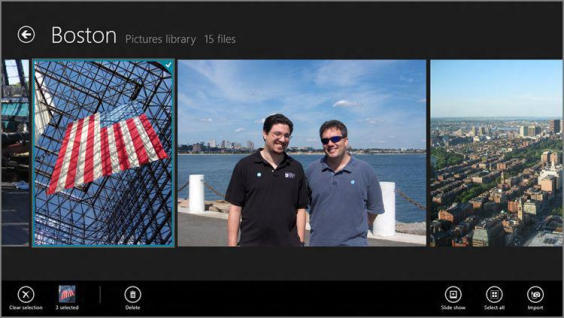
Either way, as you select photos, you’ll see two new buttons in the app bar as you go: a Clear Selection button for clearing the selection and a selection thumbnail that indicates how many photos you’ve selected; these can both be seen in Figure 9‑12. Once you’ve selected all the photos you want–again, from multiple folders–you can tap the Slide show button to start this more advanced slideshow type.
Sharing, Printing, and Searching
Many common photo‑related activities work consistently with similar features in other Metro apps, thanks to the new system‑wide capabilities in Windows 8. For example, when viewing a photo, you can print it by accessing the Devices interface (Winkey + K) or, more directly, the Print interface (Ctrl + P). Or you can use the Share interface (Winkey + H) to share the photo with others using a compatible Metro‑style app, such as Mail.
Figure 9‑12: Multi‑selecting photos from different folders.
There’s no way to search all sources simultaneously, though that would be very useful.
Likewise, the excellent Search functionality in Windows 8 can be used in Photos to find particular pictures. If you access the Search charm (Winkey + Q) while viewing a photo or from within a particular folder, the Search pane that appears will search only that folder. Search at the source level and it will search just that source.
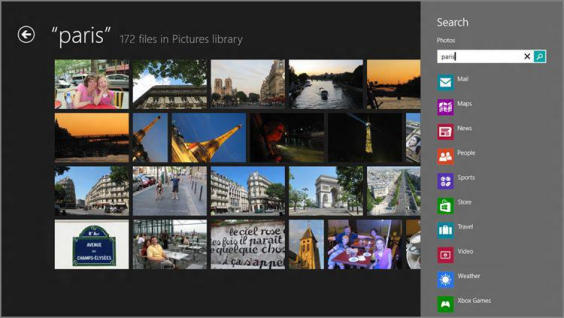
If you open the Search charm from outside the Photos app and then select Photos from the list of apps in the Search pane, you get a grid‑based view of your Pictures library, filtered to the search term, as shown in Figure 9‑13.
Figure 9‑13: A Photos search results list
Acquiring Photos from a Camera, Memory Card, or Other Device
If you’ve ever connected a digital camera, a camera’s memory card, or another device (like a smartphone) that contains pictures to Windows in the past, you know that Microsoft’s desktop OS has long supported basic photo acquisition (or what some people think of “downloading”) capabilities through desktop apps like Photo Gallery. You can still do this, if you’d like. Or, you can use the new Metro‑based photo acquisition interface that’s available through the Photos app.
When you plug in a compatible device that contains photos, you’ll see a Metro‑style notification flyover, or “toast,” like that shown in Figure 9‑14.
Figure 9‑14: Windows 8 asks what you’d like to do when you plug in this sort of device.

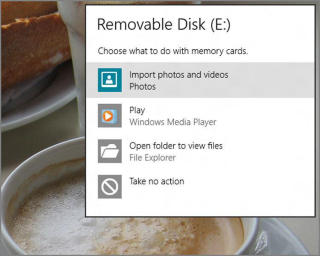
If you select this notification, you’ll see a window similar to that in Figure 9‑15; like the notification, this display can appear anywhere in Windows, including Photos or other Metro‑style apps, the Start screen, or the Windows desktop.
Figure 9‑15: Choose what you’d like to do with devices that contain photos.
The easiest way to find AutoPlay is to use Windows Search: Type autoplay, select Settings, and then choose AutoPlay from the results list.
You may want to use Photos as the default choice when such a device is plugged into the PC, though we feel that you should examine your choices before making such a decision. Remember that you can always change what happens later using the AutoPlay control panel, though. So if you make a mistake, or want to change your selection later, you can do so.
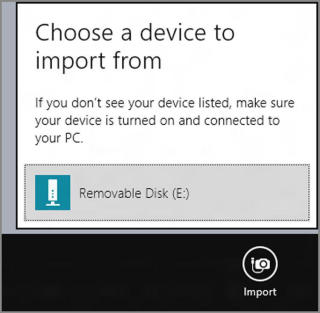
For now, let’s just use Photos to manually acquire photos from an attached camera, memory card, or other device. To do so, launch the Photos app and then display the app bar. On the far right side of this app bar, you’ll see an Import button. Click this, and Photos will prompt you to choose a device, as in Figure 9‑16.
Figure 9‑16: Choosing a device with photos.
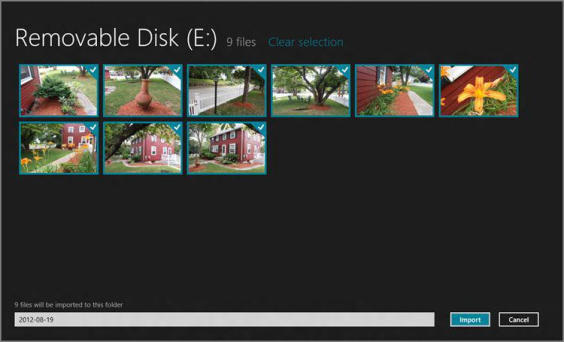
Do so, and you’ll be presented with the full‑screen interface shown in Figure 9‑17. Here, you can determine which photos to acquire and what the folder name that contains them will be.
What you can’t do, of course, is configure other photo acquisition options, and this is why we noted previously that you may want to review your options first. Photos doesn’t let you name the acquired photos to your liking (unless you happen to like the default, which is to use awful, camera‑based names). And it doesn’t let you choose whether to delete the photos from the device once they’re acquired. (They are not deleted.)
Figure 9‑17: Choosing which photos to acquire.
Click Import to acquire the photos.
When you’re done, you’re prompted to open the folder containing the photos you just imported. This will happen in Photos, of course, not in File Explorer on the desktop.
Put simply, the photo acquisition capabilities in Photos are, well, basic. And if you want more control over this process, as we do, you should consider using the free Photo Gallery desktop application instead. We look at this useful tool a bit later in the chapter.
Дата добавления: 2015-05-13; просмотров: 1679;